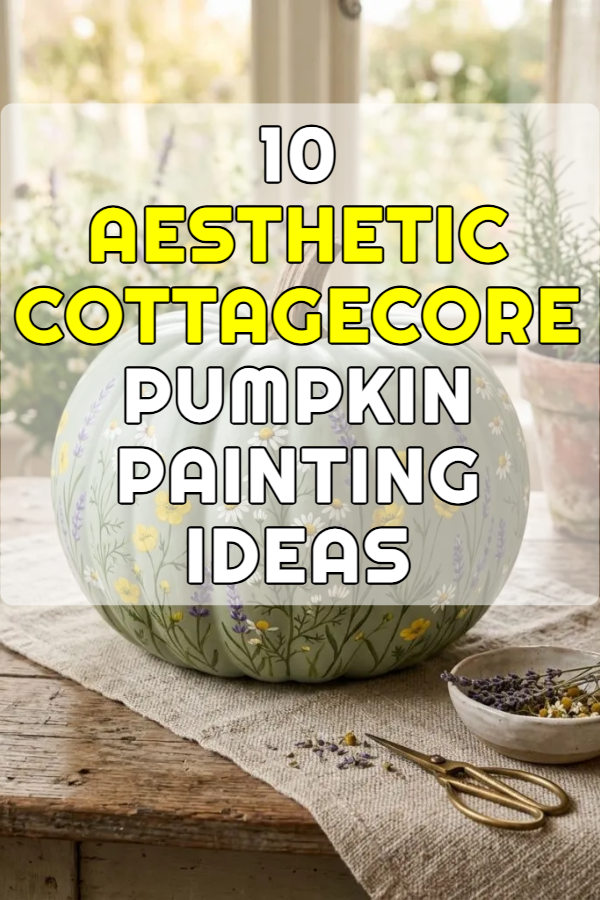
10 Aesthetic Cottagecore Pumpkin Painting Ideas

Seasonal autumn home decor often centers around natural rustic motifs that bring warmth, organic textures, and peaceful countryside charm into residential living spaces. Transforming ordinary pumpkins into delicate art pieces using soft pastel paints and botanical illustrations offers a refined alternative to conventional carving methods. Readers will learn how to prepare pumpkin surfaces, apply durable acrylic pigments, select ideal color palettes, and seal delicate artwork for long-lasting seasonal displays. Understanding these painting techniques provides a practical foundation for creators seeking elevated aesthetic home accents without dealing with messy pulp disposal or rapid decay. Mastering these creative ideas enables individuals to design customized, cohesive centerpieces that blend seamlessly with vintage furniture, natural wood tones, and cozy interior textile arrangements throughout the fall season.

Why This Idea Is Trending or Useful

Botanical painted pumpkin concepts perform exceptionally well across modern visual inspiration boards because they harmonize traditional harvest motifs with soft, nature-inspired home styling. From a practical standpoint, painting intact pumpkins preserves the outer skin, preventing early spoilage and allowing hand-painted decorations to last for months indoors or on sheltered porches. The rising popularity of minimalist style aesthetics has encouraged a shift away from harsh orange hues toward soft sage greens, creamy whites, dusty roses, and muted earth tones. As a beginner friendly creative project, painting produce requires no specialized carving tools or advanced artistic training, making it accessible to decorators of all skill levels. These trending ideas offer practical budget ideas that allow homeowners to update seasonal displays affordably using standard craft supplies and natural produce.

Materials and Preparation

Achieving smooth paint coverage and sharp line work requires selecting healthy, smooth-skinned heirloom pumpkins and preparing the surfaces properly before painting. Essential project materials include matte acrylic craft paints, synthetic artist paintbrushes, fine-point detail pens, clear matte sealer sprays, and natural sea sponges. Preparation begins by washing the pumpkin skin with mild dish soap and warm water to remove residual farm oil, soil, and organic matter. Allow the produce to dry thoroughly in a well-ventilated area for several hours before applying an alcohol wipe across the surface to eliminate remaining surface grease. Selecting a neutral chalk paint primer establishes an ideal bonding coat for subsequent detailed illustrations, ensuring vibrant pigment adhesion without flaking or streaking. Taking time to organize paint mixing trays and sketching light pencil outlines directly onto primed surfaces guarantees a smooth, efficient painting experience.

MAIN IDEAS SECTION

Wildflower Meadow Pattern with Vintage Soft Sage Base

How to Create

Constructing a wildflower meadow pumpkin design involves applying a smooth, matte sage green background to serve as a calming canvas for colorful floral illustrations. Begin by coating a medium heirloom pumpkin with two light layers of sage green chalk paint, allowing twenty minutes of drying time between applications. Once the base coat sets completely, use a fine round brush to paint delicate stem lines, small chamomile blossoms, yellow buttercups, and soft lavender spires across the lower half of the pumpkin. Layer smaller leaf clusters along the vine stems to create a natural density, keeping the upper quarter near the stem bare for visual balance. Finish the artwork by dotting tiny white accent specks between the petals to mimic wild field flora. This easy project yields a gentle, vintage-inspired accent piece that complements rustic wooden trays and natural linen tablecloths.

Moody Press-Botanical Fern Silhouettes on Cream Paper Tone

Step-by-Step Guide

Designing a pressed fern silhouette pumpkin uses negative space and contrasting natural shades to achieve an authentic countryside herbalist aesthetic. Paint the entire outer surface of a wide, flat pumpkin using a warm ivory or cream matte acrylic paint to establish a clean ceramic-like background. Collect delicate dried fern fronds or use a fine detail brush to paint intricate dark forest green fern shapes curling vertically along the natural ridges of the pumpkin. Outline the primary central vein of each frond first, then apply short angled strokes to construct fine leaf pinnules extending outward along both sides of the stem. Accentuate the base of the pumpkin with light touches of raw umber paint using a dry sea sponge to simulate aged parchment texture. This beginner friendly method produces a sophisticated botanical study piece ideal for mantel arrangements.

Delicate Porcelain Willow Pattern in Dusty Cobalt Blue

Setup Method

Executing a china-inspired willow pattern on a smooth white pumpkin combines classical ceramic artistry with rustic harvest elements. Coat a smooth, spherical pumpkin in two coats of bright white satin paint, ensuring a flawless, non-porous surface finish before painting blue motifs. Using a fine-tipped artist brush dipped in muted navy or cobalt acrylic paint, trace delicate flowing river vines, small arched bridges, and stylized leafy boughs around the center perimeter. Vary the brush pressure slightly to create alternating thick and thin stroke widths, replicating hand-painted antique ceramic pottery details. Allow the blue paint to dry fully before applying a subtle gloss topcoat spray to imitate the reflective sheen of traditional glazed porcelain earthenware. Display this refined piece alongside silver tableware or white lace runners to establish an elegant seasonal dining table centerpiece.

Faded French Lavender Sprigs on Distressed Chalky White

Execution Process

Creating a French country lavender pumpkin design utilizes dry-brush distressing techniques paired with delicate floral accents for a romantic visual texture. Apply a base layer of chalky off-white paint over a ribbed pumpkin, using a stiff bristle brush to leave subtle brush stroke ridges across the surface. Once dry, lightly drag a dry brush dipped in light gray paint over the raised ridges to create an aged, weathered plaster finish. Paint slender, curving purple stems extending upward from the base, adding clusters of tiny violet and lavender dots along the upper tip of each stem using a small cotton swab or detail brush. Frame the lavender clusters with tiny silver-green olive leaves to enhance visual depth, completing a charming handmade decoration that pairs seamlessly with wrought iron hardware and galvanized metal planters.

Mossy Forest Floor Texture with Mushroom Cluster Details

How to Make

Building a mossy forest floor pumpkin design integrates tactile earthy textures with whimsical woodland illustrations around the base of the pumpkin. Sponge a mixture of deep forest green, olive green, and dark brown acrylic paints along the lower third of an orange or tan pumpkin to simulate velvet moss growth. While the sponge paint remains slightly damp, stipple tiny flecks of pale green and beige paint over the area using a short-bristle stippling brush to build layered depth. Paint small clusters of woodland mushrooms emerging from the mossy base using creamy tan stems and soft dusty-rose or terracotta caps with fine white specks. Add slender curling ivy tendrils winding up toward the stem to tie the composition together, producing a cozy countryside accent piece that elevates rustic fall porch displays.

Golden Wheat Sheaf Silhouette on Warm Terracotta Ground

Step-by-Step Styling

Painting a golden wheat sheaf motif across a warm terracotta backdrop captures the essence of traditional harvest fields in a clean graphic composition. Coat a tall, oval pumpkin with a warm terracotta or burnt sienna matte acrylic paint, establishing a rich, earthy foundation layer. Sketch a centered bundle of wheat stalks tied with a simple cord using a soft graphite pencil along the front panel of the pumpkin. Fill the sketched wheat heads using a mixture of ochre, mustard yellow, and soft metallic gold paints applied with short, overlapping teardrop brush strokes. Trace the vertical straw stems down to a central gathered knot, painting thin thread ends dangling below the bundle. This structured design brings warm autumnal tones to indoor entryways and pairs beautifully with woven rattan baskets and burlap accessories.

Antique Botanical Rose Lattice in Muted Pastel Hues

Execution Guide

Developing a vintage rose lattice pattern transforms a standard pumpkin into a romantic floral display using muted pastel color schemes. Apply a soft dusty pink or pale peach background coat across the pumpkin surface, allowing it to dry to a smooth matte finish. Use a fine liner brush and light olive green paint to crosshatch delicate diagonal grid lines around the entire pumpkin body, creating a diamond lattice pattern. Paint tiny cabbage rose clusters at each intersection of the lattice grid by swirling soft crimson, blush, and ivory paints together with a small round brush. Add pairs of small sage green leaves around each rose cluster to anchor the floral motifs within the geometric lattice frame. The resulting intricate design adds a cozy, handmade touch to bedroom vanities and reading nook side tables.

Rustic Autumn Berry Vine Garland with Metallic Hints

Setup Procedure

Designing an autumn berry vine garland relies on flowing circular lines and contrasting warm berry tones to frame the natural shape of the pumpkin. Apply a light taupe or warm gray base coat over a medium pumpkin, providing a neutral backdrop that allows saturated berry colors to stand out. Paint a continuous dark brown grapevine winding horizontally around the upper shoulder of the pumpkin, creating overlapping loops that drape naturally along the ribs. Add dense clusters of small round berries along the vine using burnt orange, deep cranberry, and soft mustard yellow acrylic paints applied with the wooden handle end of a paintbrush. Accent select berry highlights with a tiny dot of metallic bronze paint to catch ambient room lighting softly. This versatile project works exceptionally well as a low-profile coffee table centerpiece.

Whimsical Snail and Wild Strawberry Patch Illustration

How to Execute

Crafting a wild strawberry patch design featuring small garden snails creates a storybook cottage feel on a compact heirloom pumpkin. Coat a small white or light green pumpkin in a soft mint chalk paint, providing a fresh, garden-inspired canvas for detailed miniature illustrations. Paint low-crawling strawberry vines wrapping around the base, adding three-lobed sawtooth leaves in olive green and small white blossoms with bright yellow centers. Illustrate small red strawberries dangling from delicate stems, using tiny black dots to detail the seed surfaces clearly. Add two or three small garden snails resting on the leaves, painting spiral shells in soft ochre and tan shades with fine detail pens. This charming creative project introduces a playful, nature-focused element to kitchen windowsills and open pantry shelving displays.

Soft Gingham Plaid Pattern with Autumn Leaf Overlays

Installation Method

Painting a soft gingham plaid pattern topped with realistic autumn leaf outlines creates a warm textile effect across the pumpkin exterior. Coat a smooth pumpkin in a flat white base, then use painter’s tape to mark off evenly spaced horizontal and vertical grid lines across the surface. Paint the exposed intersecting grid stripes with a diluted light tan acrylic paint, applying a second darker tan coat specifically over the overlapping square intersections to mimic woven fabric. Remove the tape carefully once dry, then paint scattered maple and oak leaves floating across the plaid background using deep burgundy, amber, and forest green paints. Detail the leaf veins using a fine white gel pen or liner brush to make the foliage pop against the soft plaid backdrop, completing a cozy fabric-inspired autumn home decor accent.

Common Beginner Mistakes and How to Avoid Them

Painting on fresh produce can present unique challenges regarding paint adhesion, drying times, and surface moisture preservation. A frequent mistake is skipping the initial cleaning and priming steps, which causes acrylic paint to bead up or peel off the natural waxy skin of the pumpkin. Always clean the pumpkin thoroughly with alcohol and apply a chalk-finish base coat or primer to ensure long-lasting paint adhesion. Another common error involves applying overly thick coats of paint in a single pass, leading to long drying times, unsightly paint drips, and cracking along the pumpkin ribs. Apply multiple thin layers instead, allowing each pass to dry completely before adding detailed line work or secondary colors. Finally, avoid placing painted pumpkins in direct sunlight or un-sheltered outdoor areas where heat and moisture cause rapid decay beneath the painted surface.

Practical Tips for Better Results

Achieving clean line work and durable finishes on curved pumpkin surfaces requires specialized handling and proper tool selection. Utilize synthetic liner brushes with long, flexible bristles when painting fine vine tendrils or text outlines, as they hold more paint and glide smoothly over curved ridges. Keep a damp cotton swab nearby during the painting process to correct minor slip-ups or smudges instantly before the acrylic paint dries. To extend the lifespan of your hand-painted artwork, apply a clear matte acrylic spray sealant in two light coats once all paint layers have cured for twenty-four hours. Resting the pumpkin on a small jar ring or tape roll during the painting process elevates the base, preventing smudges along the bottom edge while allowing easy 360-degree rotation as you work.

Styling, Presentation, or Organization Ideas

Integrating painted botanical pumpkins into existing interior arrangements requires thoughtful layering, balanced color grouping, and textured accessory pairing. Place hand-painted pumpkins on antique wooden risers, woven seagrass trivets, or vintage pedestal stands to create varying heights across a dining table or entryway console. Surround your painted display with natural elements, such as dried eucalyptus bundles, cinnamon sticks, raw acorns, and flickering flameless pillar candles, to enhance the cozy autumn atmosphere. Group pumpkins in odd-numbered clusters of three or five, mixing different sizes and background colors to achieve a balanced, visually engaging arrangement. Position lighter painted pumpkins against dark wood paneling or brick fireplace hearths to create high visual contrast that draws attention to the intricate brushwork and delicate details.

Budget or Time Planning

Managing expenses and crafting schedules effectively ensures that painting decorative pumpkins remains a relaxing, enjoyable seasonal activity. Completing a detailed painted pumpkin project typically takes between one and two hours of active painting time, excluding base coat drying intervals. Allocate your time by spending fifteen minutes cleaning and priming the produce, forty-five minutes painting main background colors and detailed illustrations, and fifteen minutes applying final sealer coats. Keep material costs low by utilizing basic craft acrylic paint sets, repurposed artist brushes, and locally sourced heirloom gourds or pumpkins. Buying multipacks of craft foam pumpkins serves as a cost-effective alternative for creators who wish to preserve their hand-painted artwork permanently for future holiday seasons. Planning your design concept beforehand minimizes wasted paint and speeds up execution.

Creative Expansion and Advanced Inspiration

Once fundamental pumpkin painting techniques are mastered, exploring advanced artistic finishes elevates your seasonal home decor to a professional level. Experiment with incorporating gold leaf or metallic bronze foil accents onto painted flower centers, leaf veins, or stem tops to introduce subtle light-reflecting highlights. Try combining hand-painted botanical motifs with decoupage techniques by applying pressed autumn leaves or vintage book pages onto the pumpkin surface before painting surrounding vine borders. You can also turn painted pumpkins into functional floral vases by scooping out the center, inserting a watertight glass container, and arranging fresh garden blooms inside the painted shell. Continually testing new color combinations, surface textures, and illustrative styles keeps your seasonal decorating fresh, unique, and visually captivating year after year.

Similar Posts

Leave a Reply

Your email address will not be published. Required fields are marked *